iPhone Camera Not Working: 7 Common Issues and How to Fix Them

Chances are, if you have an iPhone, you use it to take some great photos. Since you always have your phone with you, you need to know its camera is reliable.
However, sometimes your iPhone camera doesn’t work right, which can be either software or hardware related.
In this article, we’ll help you troubleshoot some of the common issues that may arise with your iPhone camera, and give you the solutions on how to fix these problems.
1. iPhone Camera Is Black

If you launch the camera app (or a third-party camera), and see a black screen that doesn’t change, try the following:
- First, make sure that nothing is actually blocking the camera lens. You may have put a case on incorrectly, or there may be something stuck to the camera hole.
- Close the camera app by double-clicking the home button and swiping the app card up to kill it. On an iPhone X, swipe up from the bottom and leave your finger halfway up to bring up the app switcher, then long-press on any app preview until a red circle shows up in the top left corner. Close apps by tapping on that circle or just swipe the card up and away.
- Try launching the camera app again.
- If that didn’t work, try restarting your device and then launching the camera again.
- Try switching back and forth between the front and rear-facing cameras to see if the black screen appears on both. If it’s only one, you may need to take it to an Apple Store.
2. iPhone Camera Is Blurry or Won’t Focus

If you’re taking images and find them blurred or out of focus, try these steps:
- Make sure the camera lenses are clean. If there’s a smudge, wipe it with a microfiber cloth. Should you find dirt or debris inside the glass, then you’ll need to take it to an Apple Store or Authorized Service Provider for help.
- If you have an iPhone with optical image stabilization (iPhone 6s Plus, iPhone 7/7 Plus, iPhone 8/8 Plus, and iPhone X), then metallic cases or magnetic lens accessories can interfere with this feature. Try taking the accessory off, then take a photo and compare with the image produced while it’s on.
- When snapping photos, make sure your hand is steady when tapping the shutter button or pressing the volume up button. If you still have issues with stability, you could consider looking into a mobile tripod or mount.
3. iPhone Camera Flash Isn’t Working

Even though photos tend to look better without flash, sometimes you may need that additional light from your device. When flash isn’t working, try this:
- Test the LED flash on your phone with the flashlight, accessible from Control Center. If this doesn’t work, you’ll need to contact Apple Support.
- Ensure the flash setting is set to what you want (Auto, On, or Off) by tapping on the lightning bolt icon in the upper-left corner of the screen.
- Be careful of using the flash in an extended video or a hot environment. You’ll see the Flash is disabled message until your device cools down if it gets too hot.
4. iPhone Photos Are Flipped When Transferred
This one happens often for me, usually with horizontally oriented photos. When I upload them, they end up getting flipped vertically, which isn’t how I took them.
I’ve noticed that this also occurs when I take pictures with the volume buttons on top, since it’s easier for me to press the volume up button as the shutter. If this occurs to you as well, try the following:
- Take horizontal photos with the volume buttons pointing down. This has to do with the iPhone’s sensors, and the data they put into the image’s EXIF data.
- You can always edit the image on your phone to make sure that it’s in the correct orientation before transferring, or modify it on the computer with a photo editor.
- Third-party apps, such as Camera+, can recode your images so the orientation is always correct. However, as powerful as camera replacement apps are, they’re definitely not as fast to launch, so keep that in mind.
5. iPhone Camera Not Found or Freezes When Switching

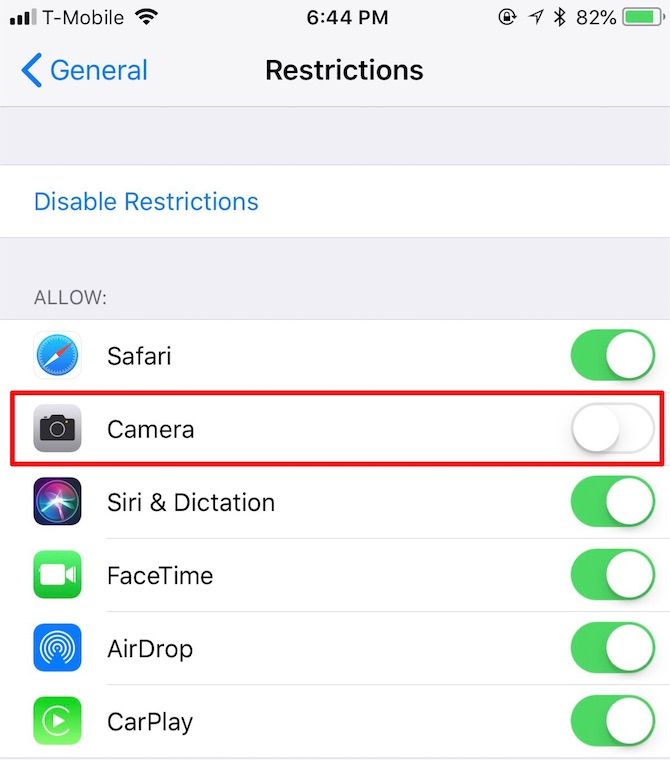
If you’re having issues finding the Camera app on your Home screen, or experiencing freezing when trying to switch between cameras, it may be due to Restrictions settings. To check this:
- Go to Settings > General > Restrictions.
- Input your Restrictions passcode.
- Make sure that the toggle for Camera is on (green).
6. General iPhone Camera Software Fixes

If you experience any other oddity with your iPhone camera, it’s always a good idea to try software troubleshooting first. These steps are pretty easy, and should fix any issues that may arise:
- Force quit the app and try launching it again.
- Restart your device and launch the camera again.
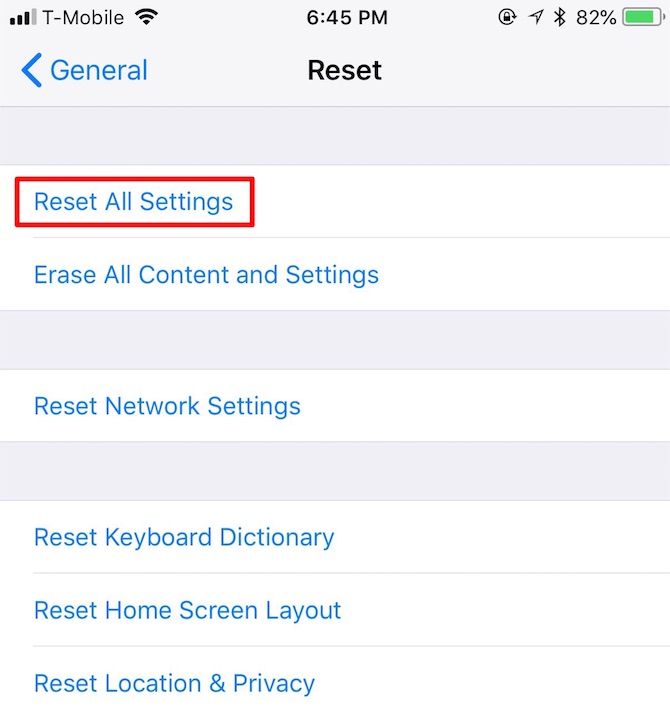
- If the above two don’t work, try going to Settings > General > Reset > Reset All Settings. Note that you’ll need to put everything back the way you had it after using this.
- When all else fails, try restoring your device or set it up as a new device. This is a last resort, but should get rid of any software issues causing issues with your camera.
7. General iPhone Camera Hardware Fixes
If you’ve tried everything above and it didn’t fix your camera problems, then you may have a hardware problem. You should try the following:
- Double-check that the camera lens is not obstructed by a case, sticker, or similar objects.
- Make sure there are no smudges, dirt, or debris on the camera lens. Smudges and fingerprints should wipe away easily with a microfiber cloth. If dirt and debris are under the glass lens, take it to an Apple Store or Authorized Service Provider.
Get Back to Taking Great Photos With Your iPhone
These are some of the most common problems that you may experience with the iPhone camera. And if your problem isn’t listed here, then the generic software troubleshooting tricks usually fix the problem.
If you’re wondering why your selfies always get flipped, that’s just how Apple designed the front-facing camera. Its works like a mirror, but the final result gets flipped as if someone took the picture for you, rather than you taking it yourself.
And if you run out of storage and can’t take any more photos, check our tips on iPhone photo management to help you reclaim precious space.
Read the full article: iPhone Camera Not Working: 7 Common Issues and How to Fix Them